
WatchGuard has implemented several new features in its WebBlocker content filtering service over the last few firewall revisions. WebBlocker is the subscription service that allows a firewall administrator to deny access to sites based on their category. Previously, this service only allowed for two actions: Allow and Deny. Now, WatchGuard has implemented a Warn action, as well as other options for allowing users to bypass if set with appropriate permissions.
WebBlocker ‘Warn’ Action
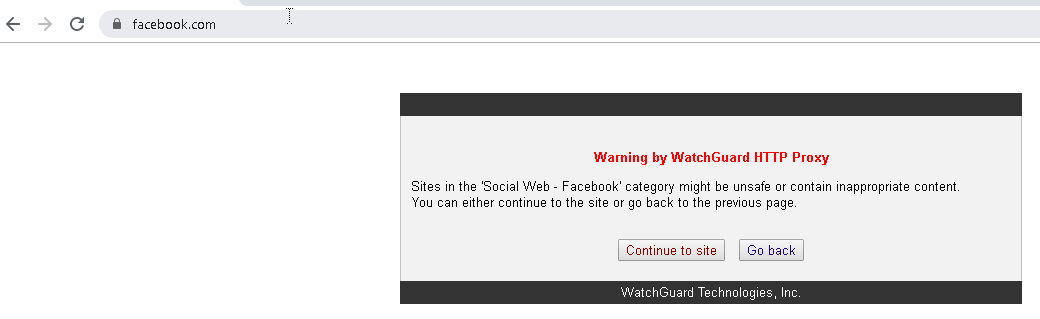
Now when configuring WebBlocker, you can choose to set a category as “Warn.” Instead of outright denying the user, this will present them with a warning that they may be accessing an unsafe site.
To configure this new feature, access your WebBlocker configuration in Policy Manager by going to Subscriptions Services > WebBlocker > Configure. Open the profile you want to edit, and find the category you want to set to Warn. Highlight the category, and under the Quick Action drop-down select Warn.

Warning Message
You can change the warning message that will be presented to your users. To do this, open your HTTP proxy policy and edit the proxy action. Select the Deny Message tab. Here you can update the HTML of the Deny Message section. You can select Preview to see what the message will look like.

WebBlocker Override by Authentication Group
WatchGuard has also implemented the ability for members of a particular authentication group to be able to override a WebBlocker deny through the use of their credentials. This can be useful if network administrators need to allow users to bypass a website block temporarily.
Before configuring through WebBlocker, make sure you have an authentication group configured. For this example, we will set up a local group by going to Setup > Authentication > Authentication Servers.

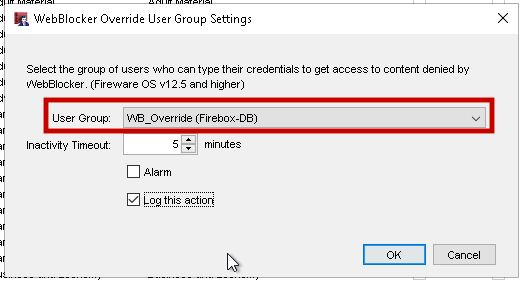
Now this group can be applied to your WebBlocker profile. Go to Subscription Services > WebBlocker > Configure. Open the WebBlocker profile you would like to apply this setting to. On the Categories tab, check the box for Enable WebBlocker Override at the bottom, and set the option to User Group.

Click Edit and select the group you would like to allow override access. It is recommended that you log this action.
Once configured, anyone with an account in the bypass group can use their credentials to gain access to the website that is blocked.
