
If you are running any M-Series WatchGuard Firebox with Total Security Suite except M200, M300, and M400, you have access to the WatchGuard Access Portal. This feature allows you to create a web-based portal to provide access to remote users. This clientless console includes an HTML5 application portal, SSO (single sign-on) for remote desktop and SSH services, and SAML 2.0 capabilities.
From the access portal you can create RDP (remote desktop) connections, SSH connections, and web access connections. For organizations moving to more cloud-based access, this provides an easy-to-manage, centralized portal to grant access to the resources your users need.
Model Availability
The WatchGuard Access Portal is available on the following models licensed with Total Security:
- M370
- M400
- M440
- M470
- M500
- M570
- M670
- M4600
- M5600
Activating the Access Portal
In order to set up the Access Portal subscription service, open WatchGuard System Manager and access Policy Manager. Then navigate to Subscription Services > Access Portal. Check the option to enable the Access Portal.

Adding Resources
To set up the access available when a user logs in, you will need to create resources for the Access Portal. In order to add a resource, click Add on the right side. You will have three primary options. You can allow access using remote desktop(RDP), SSH and a web resource.
NOTE: Access to internal web resources is currently not allowed. Web resources must be external to be available in the Access Portal.
Setting Up Remote Desktop Access
Let’s use RDP as an example. You can utilize IP addresses as well as DNS names, as long as your firewall references your internal DNS server in the network settings. On the first tab, provide the name and connection information for the device.
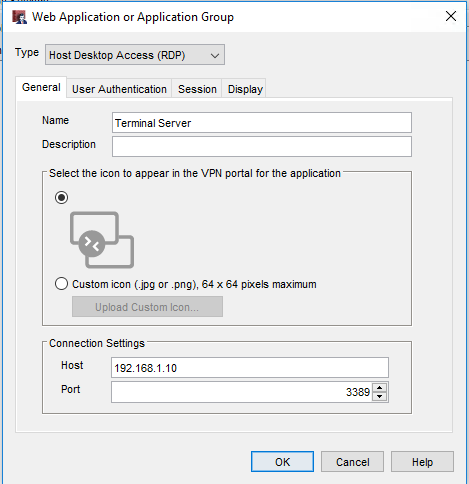
Next, click on the User Authentication tab. If you want to force users to enter their own credentials, set the Security option to TLS. Make sure check the box for Trust Certificate as well.

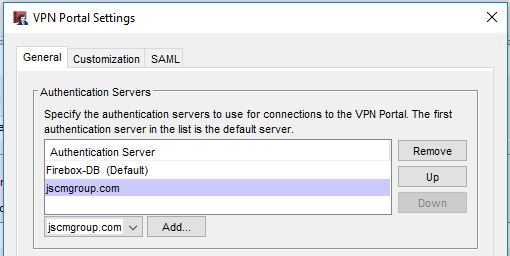
Specifying Authentication Method
By default the Access Portal utilizes the Firebox-DB authentication method. This means that you must create accounts locally on your Firebox for users to authenticate with. If you would like to change to another authentication server, you must do so on the User Connection Settings tab.

Under the VPN Portal section, click Configure. Add your preferred server to the list. If you do not plan on using local Firebox accounts, remove the Firebox-DB entry from the list.
Customizing Access
With the access portal, you can control access to the resources you set up based on the user. To do so, navigate to the User Connections Settings tab. By default, all resources that you create will be accessible to anyone that connects.
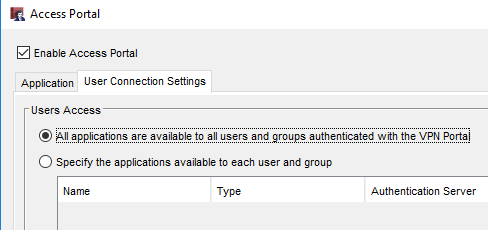
If you would like to specialize this access, select the option Specify the applications available to each user and group. Click Add to create a new level of access.

Select the authentication server and group you want to utilize. Then select the applications that you would like available for this group.

Portal Customization
If you would like to customize the look of the portal, click Configure on the User Connection Settings tab. Then click the Customization tab. From here you can add customizations such as a page title and your organization’s logo.

Accessing the Portal
The WatchGuard access portal operates on the same IP address and port as the SSLVPN. To get to the Access Portal, navigate to https://<External IP Address>.

This will bring them to the login portal.

Once logged in, your users will have access to the resources you have set for them.
Changing the Default Port
The Authentication Portal defaults to using port 443 on the IP address assigned to the SSLVPN. This may interfere with other inbound access, so you can change the default port.
To do so, navigate to VPN > Mobile VPN > SSL. If your SSLVPN is not activated, you will need to enable it simply to change the port. It can then be disabled.

Once the SSLVPN is enabled, select the Advanced tab. You will see the default port as 443. You can change it to another port that will not interfere with preexisting connections. In this example we change our VPN to use port 444.

Once you have changed the port, you can deactivate the SSLVPN if it was not in use. For future Access Portal connections, users will need to append the new port to their access. For example, by using port 444, our users will now need to connect to:
https://<External IP Address>:444

NOTE: If you change the port and your SSLVPN is configured, your users will now need to connect with the port appended.

Virtual IP address Pool?
With the WatchGuard Access Portal, there is no need to set up a virtual IP address pool like with the other mobile VPNs. Since the Access Portal is an HTTPS encrypted portal, there is no need to assign virtual IP addresses to users that connect. When you monitor the authenticated users under Firebox System Manager, you will see the external IP address that their connection is originating from.
Monitoring Authenticated Users
You can view users that are connected to the Access Portal Manager in Firebox System Manager. Navigate to the Authentication List tab. You will see anyone connected under the Firewall Users section.
